
You have 0 items in your cart

 Your Xero Inbox:
Did you know it is true, you can be paperless! You do not need to store a shoebox, or files full of receipts anymore!
All those well organized files in the metal drawers can be dwindled down to retain only the most important paper copies. Not only will your shredder thank you because it’s only going to shred the things sent to you and not all the copies you print, but also the trees will thank you!
One of the cool things about Xero, that QuickBooks doesn’t have, is a secure cloud-based filing system.
Within your Xero account, you have a Xero Inbox, but keep reading to learn about all the features that expand from this little buddy of ours…
How do you get things in the Xero Inbox?
The Xero Inbox is located in your Xero Account. Look for the Open Folder icon in the upper right. Click the Open Folder icon to go to your inbox page. Here you’ll find a long email address that is specific to your folder. 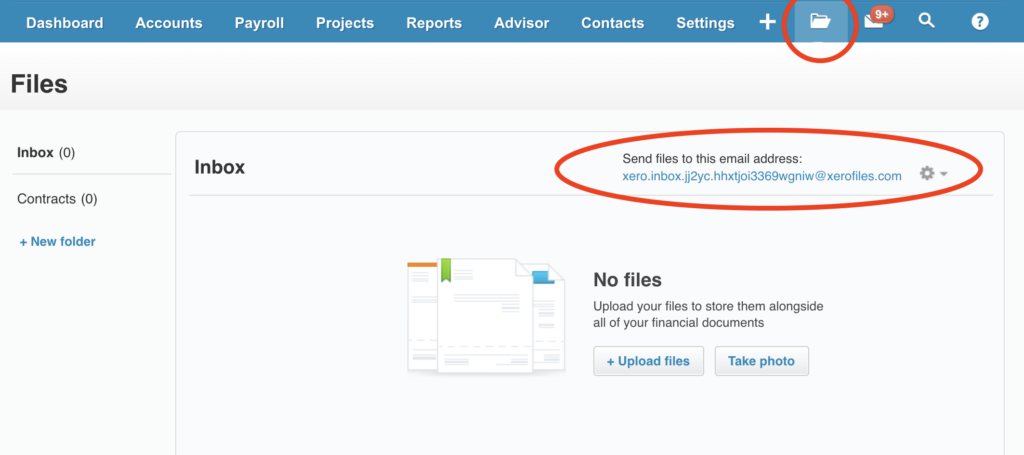
- You can email documents right to the inbox. Stipulation: they must be attachments. Any format will do, but it has to be attached to the email. Text and html within the email and subject lines are not translated into files in the inbox. Only attachments.
- I recommend saving your personal Xero Inbox email as an easy to recall contact in your email server with a name such as “Xero Inbox.” This email address is found in the upper right of your Inbox page. Click the gear icon to copy the email to your clipboard.
- Take pictures with your phone of paper receipts and docs and use your phone’s forwarding feature to instantly email it into the inbox. You no longer need to retain the paper copy.
- You can also use the Xero App on a smart phone or iPad, but there are actually more clicks to upload, so our hack is to do “B” above.
- At online checkout, download the receipt and either login to xero and drag & drop to the inbox, or email it in.
- Receive a receipt in your Email Inbox? If it’s an attachment, like a PDF, just forward that email directly to your Xero Inbox email address.
- If the email receipt you receive does not have an attachment, as many now are HTML or text within the actual email, then just take a screenshot (Command+Shift+4 on Mac to drag around just what you want to capture in the image, and PrtScn button on PC). Attach that screenshot to an email and forward that to the inbox, or drag it into the folder if you’re logged into Xero.
- Any of the above methods take less than 30 seconds and then you don’t have to retrieve it later or wonder what the heck that purchase was later when it comes through with a name you don’t recognize.
- You can to upload documents when you are logged into Xero, straight from the inbox. Just click Upload, and grab multiple files or a single document from your computer.
- You can also drag and drop from your computer to the web page. Do this for batches of multiple files in a folder, or just drag a single document from your desktop and drop it into the Xero Inbox. Anywhere on the web page will do. Instantly there!
[info ]My recommended Best Practice: Send in your docs to the inbox at the time they occur, as soon as it comes onto your plate. [/info]
What’s really cool, is that you don’t have to only use the inbox. You can use any page where you see the document icon.
![]()
What do I do after my documents are in the inbox?
- You can create transactions from them. This will move the file out of the inbox and is now a “paper trail” on the transaction. Whenever you open the transaction, you can see the original source document.
- You can move them to a folder. We like to have specific folders for Monthly Bank Statements, Tax Years, and other items that aren’t attached instead to a specific Transaction or Contact.
- Yes! You can put all docs specific to a vendor, supplier, or customer in their respective Contact. Pull up a contact and click on the doc folder to move from the library (aka Xero Inbox) or Upload from your computer. There is no limit on the number of documents here. We like to put receipts, bills and invoices with their respective transactions, while contracts and other non-transactional forms with the contact themselves.
- You can also bypass the Xero Inbox and upload or drag and drop a document, or multiple documents, onto a transaction or contact screen.
This allows you to create a complete paperless filing system with backup documents for all or many of your business transactions. It is more functional and more robust than any paper filing method.
You can even send attachments to your customers when you email them Quotes or Invoices, or to your Vendors when you send a Purchase Order.
- Upload to the transaction the document(s) you want to associated with the transaction. This can include a mix of what you want to be seen internally and what you want your client or vendor to see. You will select which items are visible when you send a Quote or Invoice, Purchase Order or Bill.
- Click the Gear Icon next to the attachment.
- Select Include with Invoice (or other transaction type per the type of transaction you are using) if you want the attachment to be viewed when you send.
- When you click Send, an Email form pops up so you can customize your default to the specific situation. At the bottom of this form are check boxes, here you will select to include the attachment. So just in case you didn’t really want it to be included, you have a second prompt to test your decision.
![]()
The possibilities are endless as to WHAT it is that you could attach, but some of the things include:
- Pictures of the actual jewelry
- Renderings aka Drawings
- Terms and Contract Agreements
- Job packet
- Receipts
- Reports
- Backup documentation related to the transaction
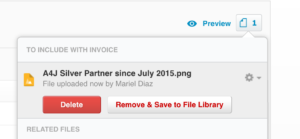
What happens if I accidentally attached something and don’t want it there?
Easy peasy, just like Xero. You just have to:
- click on the attachment document icon,
- click remove,
- then select Delete if you want to remove it from Xero completely,
- or select the Library option if you want to use it later in a different transaction.
See image below:


[…] […]